Here is a vagary I devised: What if I inlaid the back of a violin? It’s been done before, to good effect. Maggini got a little carried away with purflings, for example. Others have used pearl inlay and so forth. I wanted ebony.
I brought the idea to Dave, who is an illustrator. We worked out some designs on the computer and Dave came up with a fine vector graphic of a rose, based on some photography he did of the local flora.
How does one execute a nice inlay? Well, I don’t know. But here is how I did it–
First, I obtained some materials. I bought 1/8″ thick ebony blanks from Matt Furjanic at Inlay Banding. It’s good stuff and not that expensive.
Here is a picture of the rose, which I printed on a laser printer; and the ebony strips, and a pencil thrown in to add a little extra class:

Since I wanted to cut this inlay in one piece, I needed to glue up the blanks into a slab that would accommodate the entire design. I think a lot of inlay artists do this work piecemeal, mostly because they are working with small bits of shell. I couldn’t come up with a great way to divide this design up, and it was easiest for me to think of it as one piece.
Here I cut the ebony into smaller strips prior to gluing them up:

Next, I jointed, glued and clamped the pieces together:


After I made a suitable piece of ebony for cutting my design, I needed to attach my template to it:

The inlay is ready to be cut. I always look for little shortcuts when I get to a tedious part like this, so I thought I might be able to use my Dremel with the routing base to cut it out. I failed at that attempt:

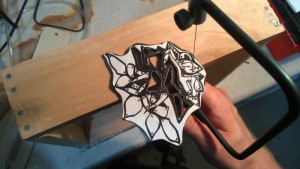
I was forced to do it the right way:

Time to transfer the pattern onto the back of the violin for the inlay rout:

Here is the result:

At last, I can use my routing jig for its intended purpose. This is the fun bit:

Here is the finished inlay rout:

I used hide glue to install the ebony in the routed inlay cavity. I had to break my piece into several smaller ones to fit the contour of the back, again reminding me that inlay ought to be done in small pieces for a reason.
After the inlay is glued, I needed to trim and level it:

Finally, I put some wood filler into the gaps, let it dry, and scraped the whole thing smooth:

Here is what it looked like after I finished it, but before I did the varnish:

And the final result:


Peter,
You might consider gluing 1/16 thick ebony to a larger 1/16 plank of less expensive sacrificial wood, running the grain of the ebony perpendicular to the grain of the sacrificial piece. This would give you something to hold or clamp on the end of a workbench while sawing the pattern. Just a thought.
Matt…
LikeLike
Matt,
That’s a good idea I hadn’t thought of. Thanks!
LikeLike